|
Models
Box Model
Number
|
ZN-C2M
|
ZN-C1M
|
ZN-C1
|
Dome Model
Number
|
ZN-DT2MA
|
ZN-DT1MA
|
ZN-DT1A
|
|
Resolution
|
1080p
2 Megapixels
|
720p
1 Megapixels
|
VGA
1/3 Megapixels
|
Selectable
Resolutions
|
1920 x 1080, 1920 x 1080 (Wide), 1280 x 1024, 1024 x 768, 1280 x 720, 1280 x 720 (Wide), 704 x 576, 704 x 480, 640 x 480, 352 x 288, 352 x 240, 320 x 240
|
1280 x 1024, 1024 x 768, 1280 x 720, 1280 x 720 (Wide), 7040 x 576, 704 x 480, 640 x 480, 352 x 288, 352 x 240, 320 x 240
|
704 x 576, 704 x 480, 640 x 480, 352 x 288, 320 x 240, 320 x 240
|
MP Megapixel Cameras
|
Camera Firmware
Current Camera firmware Versions: as of 5/29/09 (Right-Click link and select "Save Target")
(NOTE: v62704 is the last F/W version for the long body camera styles, otherwise new versions will fry the camera)
- fwupdate_MP1DN_MP2DN_MP3DN_MP5DN_65145.txt Beta DN H.264 version 10/22/2010
- fwupdate_MP1_MP2_MP3_MP5_v64343.txt Beta MJPEG version 10/22/2010
- fwupdate_MP1_MP2_MP3_MP5_v64344_dn.txt Beta DN MJPEG version 10/22/2010
- fwupdate_MP1DN_MP2DN_MP3DN_MP5DN_65140.txt DN H.264 version 12/14/2009
- fwupdate_MP1_MP2_MP3_MP5_v64328_(1300210031005100)_CBC.txt MJPEG version 01/03/2009
- fwupdate_MP1_MP2_MP3_MP5_v64006_DN_CBC.txt DN MJPEG version 07/03/2008
- fwupdate_MP3DN-2_v64329_CBC_3130.txt 09/02/2008
- fwupdate_CBC8360_v65010.txt 07/29/2009
- fwupdate_CBC8180_v65010.txt 07/29/2009
Current FirmwareLoader
CBCFirmwareLoader5.2.2.7.exe v5.2.2.7 05/22/2009
Previous Camera firmware Versions:
MP1DN, MP2DN, MP3DN, & MP5DN:
- fwupdate_MP1DN_MP2DN_MP3DN_MP5DN_65114.txt H.264 version 05/21/2009
- fwupdate_MP1DN_MP2DN_MP3DN_MP5DN_v64327_(1305210531055105)_dn_CBC.txt 01/03/2009
MP1A, MP2A, MP3A, MP5A, MP1, MP2, MP3, & MP5:
- fwupdate_MP1_MP2_MP3_MP5_v62704_CBC.txt
- fwupdate_MP1_MP2_MP3_MP5_v62414_CBC.txt
MP3DN-2:
- fwupdate_MP3DN_v62704_CBC.txt
MP8D cameras:
- fwupdate_MP8D_64630_(8360)_CBC.txt 01/05/2009
- fwupdate_v62913_MP8D_CBC.txt 09/01/08
MP8P cameras:
- fwupdate_MP8D_65006_(8360)_CBC.txt 04/09/2009
- fwupdate_MP8P_65007_(8180)_CBC.txt 04/15/2009
- fwupdate_MP8P_v64630_(8180)_CBC.txt 01/03/2009
- fwupdate_v62913_MP8P_CBC.txt
Previous Firmware Loader versions:
CBCFirmwareLoader5.2.1.5.exe v5.2.1.5 01/31/2009
FirmwareLoader.exe v5.1.2.4 08/04/2008
FirmwareLoader.1.3.9.62.exe v1.3.9.62 08/04/2008
Current Hardware
- MP5DN HW hwupdate_A264_5105_64819_65245_65204.bin 02/20/2011
CBCA Camera License Key to allow video recording on MP100 software:
CBCACameraKey.lic
Firmware Installation:
CBC Firmware Loading instructions.pdf
IMPORTANT:
DISCONNECTING THE POWER TO THE CAMERA DURING THE UPGRADE WILL
RESULT IN PERMANENT DAMAGE TO THE CAMERA
Simple instructions:
- Download Firmware, and FirmwareLoader.exe (right-click, select "Save Target As...")
- Save files to: C:\Program Files\CBC America\ Video Surveillance\
- Read the User Manual and Firmware Manual,
- Shut down MP Camera software, and be sure that now other program or browser is accessing the camera.
- Shut down Windows Firewall (Start/Control Panel/Network Connections/Local area connection/Properties/Advance/Firewall/Off),
- Setup Cameras, network, & Computer (wait at least 11 seconds after camera led’s light up before attempting to access camera).
- Install CBC Video Server software.
- Copy Firmware files and FirmwareLoader to the “C:\Program Files\CBC America\Surveillance Video” folder.
- If CBC Video Server software has been run before or another set of cameras have been updated, delete all ini files in the folder “C:\Documents and Settings\All Users\Application Data\Video Application” and delete archive video folder from “C:\Video Storage” (create Desktop shortcuts if this will be a repetitive option).
- Run CBC Video Server software.
- Select Camera Setup.
- Select Install in Basic mode to auto assign IP addresses and to install cameras and to lock them to the software.
- If all cameras are not installed:
- Select Advance mode.
- If there is only one or two uninstalled cameras, continue to the next step, otherwise select the installed cameras and then select Remove Selected.
- Select Find Cameras.
- Select all found uninstalled cameras then select Install.
- If Error message "Video Unavailable" or if camera install takes a very long time:
- Either unplug and re-plug power source to the camera or the switch (wait for switch to boot and then to power up cameras).
- Repeat Step a) above.
- Repeat a) and b) if necessary.
- Leave Camera Setup program running and select FirmwareLoader.
- Select find Cameras.
- Select Update Firmware and select associated firmware file for the selected cameras.
- If a camera won’t appear in FirmwareLoader – you may manually update a single camera by typing in the IP address, in the upper left corner.
When the upgrade is complete “Success!” message will be displayed, under Results, with the new revision of firmware.
MP8P Note: the MP8P camera uses the MP8D circuit boards so after an upgrade you may need to reset the camera description register from 8360 to 8180.
Instructions:
After the MP8P firmware is updated, it will have the name of MP8D in the Camera Setup program.
To correct this run the following http register command in an Internet Explorer browser:
"http://[IP-Address]/setreg?page=3/®=98&val=8180"
For example:
"http://192.168.105.81/setreg?page=3/®=98&val=8180"
where 192.168.105.81 is the address of the camera.
Then the MP8P camera needs to be reset to factory default, by accessing the camera’s web page, go to Settings, then System, then select Reset Factory Default.
If this is not done, when the camera is repowered, it will revert to the original settings.
|
|
Camera Flash Drive
CBCA_Flash Drive_DN.zip 12/29/2008
|
|
Camera Setup
You should design your network such that the camera traffic does not interfier with the computer network.
Note: It is may be best to bench test or pre-configure your camera-server system inhouse with an Internet connection before installing in the field.
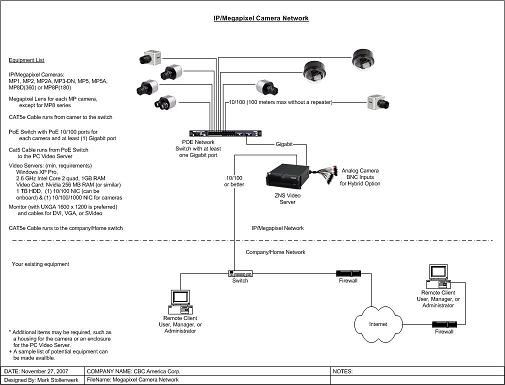
Download Example Layout MegapixelCameraNetwork.pdf
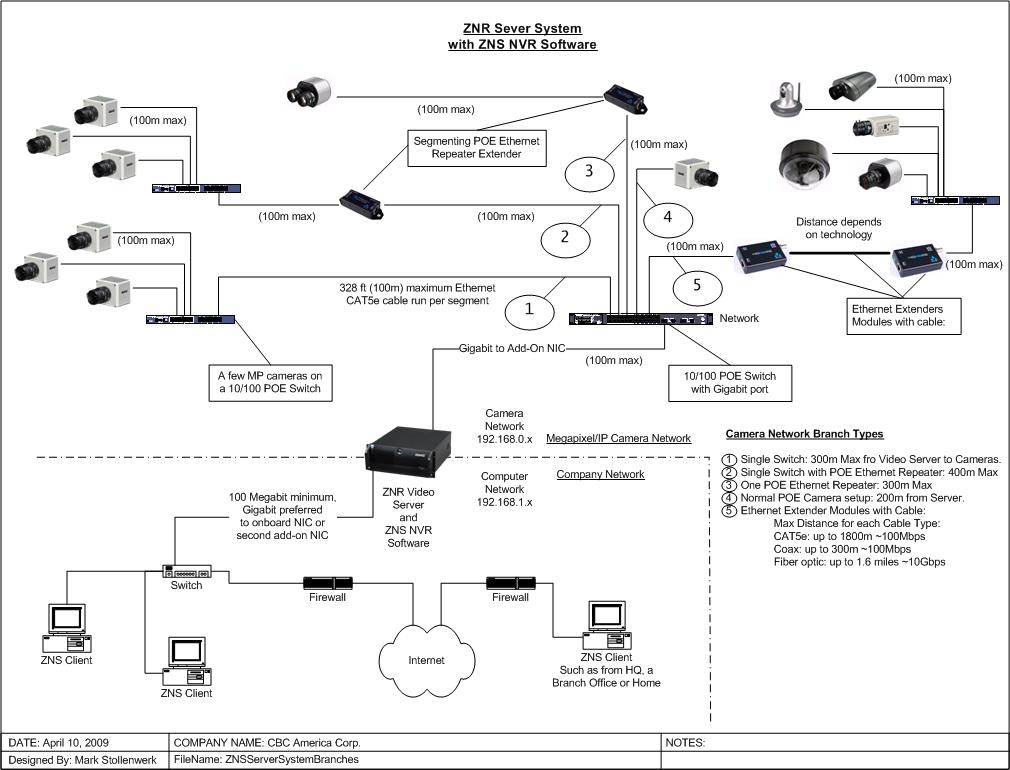
Download Example Layout MegapixelCameraNetworkBranches.pdf
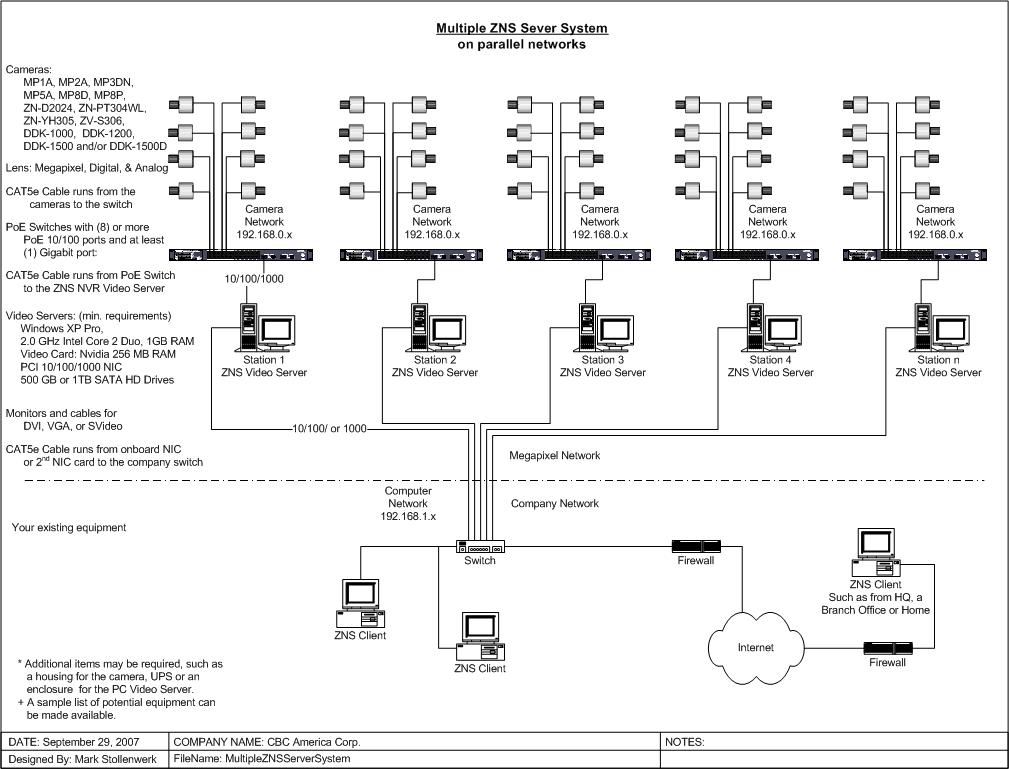
Download Example Layout MultipleZNSServerSystem.pdf
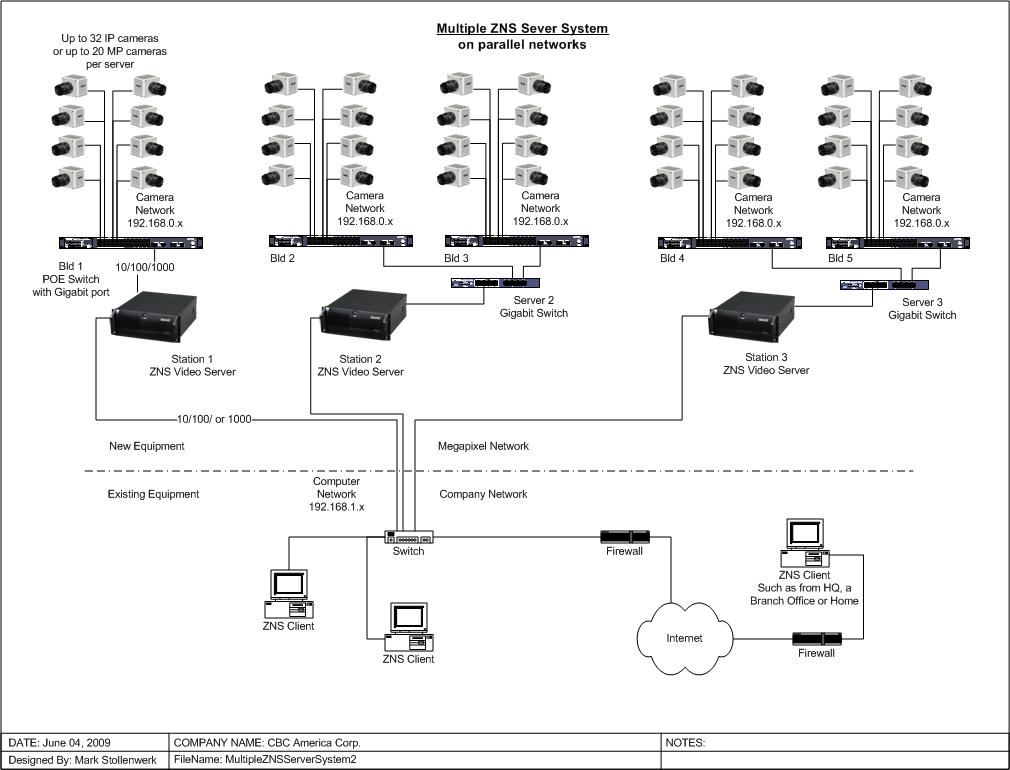
Download Example Layout MultipleZNSServerSystem2.pdf
Install CBCA Video Server Software.
Run Camera setup so that all cameras and server are on the same IP address network.
Run Live Video.
|
|
FAQ
How to reduce SPEED BLURR?
- Have enough light.
- Open Iris as much as possible.
- Under Exposure, set to Speed or if not enough, to High Speed at 10. Then reduce by one until blurr is gone.
How to reduce Glare?
- Open Iris as much as possible.
- Under Image Quality, reduce brightness value.
How to increase Frame Rate?
- Remove any unnecessary programs, including Anti-Virus.
- Do not use Microsoft Outlook.
- Set the number of Live View screens to four.
- Under Image Quality, set Frame Rate to Max
- Crop image under Image Quality. That is, crop unneeded sky and ground.
- Design network to handle camera traffic. A Gigabit connection may be necessary from the switch to the Video Server.
- Do not run PC on battery.
- Turn off Wireless Network interface on PC.
- If you still need more frames, turn Off Live View.
- And lastly, turn Off Archive.
How to improve overall PC performance?
Hardware
- Motherboard must have PCI express slots.
- Motherboard must not have video on board.
- Use PCI express 256 MB video card or better. ATI, Gforce, and Nvidia are all good.
- Disable onboard NIC in BIOS. Use PCI express Gigabit NIC or better.
- Use two Gigabit NIC's. One for Video Network and the other for Client or company network.
- Use faster Hard Disk Drives. 7200 RPM SATA is good to start with 300 MBps Transfer Rate, 11ms Seek, 4.16ms Latency. (SCSI is better as is 10,000 RPM and 15,000 RPM but not normally necessary)
- Use RAID 5 drives for storage. HDD 1 for OS, setup HDD 2,3, 4, & 5 as a RAID 5 drive.
- Use a better CPU. i.e. Core 2 Duo 2.0GHz, Core 2 Duo 2.6GHz, Core 2 Duo 3.0GHz, Core 2 Quad 2.6GHz, Core 2 Extreme , or ...
Software
- For Windows XP users: If you've installed Service Pack 2, then there is likely culprit for poor network performance. Explained in [knowledge base article 842264 (http://support.microsoft.com/?kbid=842264), Microsoft says that disabling Internet Connection Sharing after an SP2 install should fix performance issues.
- Remove all un-necessary programs like MSN, and Windows Messenger,
- Use a program like http://www.tune-up.com to optimize your PC.
- Check that UDMA is active.
- More to follow...
|
|
Storage Calculator
Download MP-Series Calculator.zip
|
|
Internet Speed Test
http://www.speakeasy.net/speedtest/ [Simple]
http://www.connectionanalyzer.com/ [Detailed]
(Note: I use VoIP tools since VoIP has higher performance requirements than Video)
Sample Speed Test Results:
(I purchased the premium package, up to 12Mbps download and 1Mbps upload speed, from Cox Cable @ $60/mo)
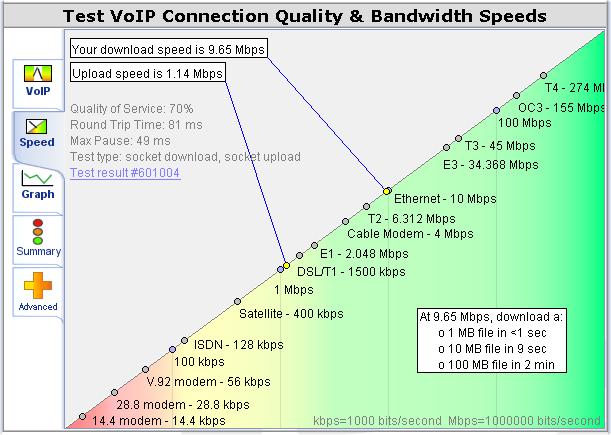
1. Speed Test
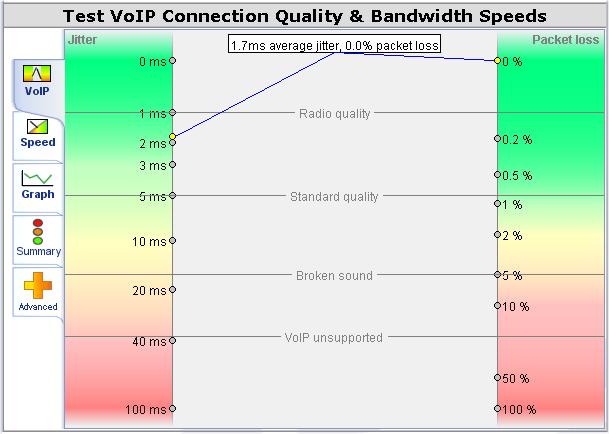
2. Jitter-Packet Loss
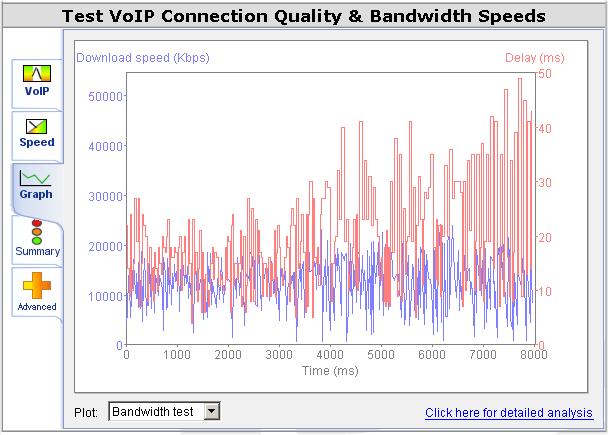
3. Speed Test Graph
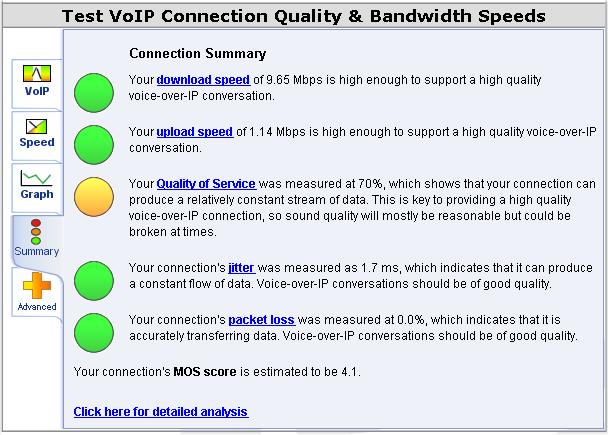
4. Summary
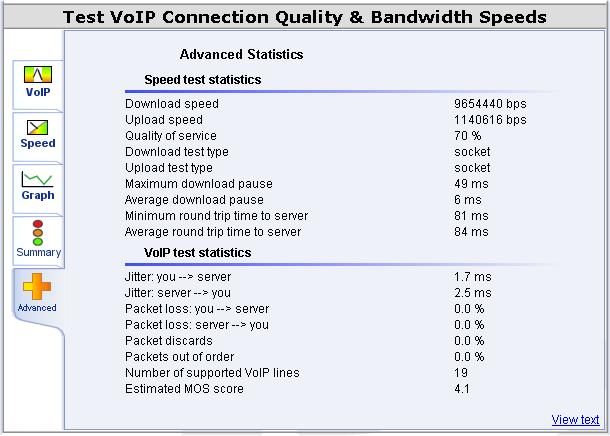
5. Advance
|
FAQ
Some Helpful Hints
|
Windows Vista troubles
Most Vista problems can be solved by setting LocalMachine to run as a Local Administrator.
|
 ©2010
MSWERK
|


 ©2010
MSWERK